Create a 3D-Terminal Renderer
Author: Tage Danielsson Date: 2024-11-05Introduction
When me and Felicia set out to build a 3D-terminal game we needed, of course, a 3D renderer! So I started to create one. In this blog post I will show you how to build one yourself, from scratch.
General Idea
The general idea is that we will shot a ray through a pixel on our screen (in our case a position in the terminal), then we will calculate what triangle in a mesh that ray will hit and lastly we will draw the color of the triangle to the screen (using ansi-codes for coloring the characters in the terminal).
Setup
Make sure that you have rust and cargo installed. Then run
Cargo new terminal-renderer
Then setup your folder structure like this:
terminal-renderer
+-- Cargo.toml
+-- src
|   +-- lib.rs
|   +-- main.rs
|   +-- math
|   |   +-- mod.rs
|   +-- renderer
|   |   +-- mod.rs
Then add the dependencies (term_size
and vec3-rs) to the Cargo.toml file:
[dependencies]
vec3-rs = "0.1.6" # Vector operations
term_size = "0.3.2" # Getting terminal size
Add includes to lib.rs
pub mod renderer;
pub mod math;
Rays through screen
As mentioned before we want to "shoot" rays through every pixel on the screen.
Theese rays will be represented as a origin point and a ray direction. We start by
creating a struct for this in the math module and implement a new function for it.
// math/mod.rs

use vec3_rs::Vector3;

pub struct Ray {
  pub origin: Vector3<f64>,
  pub dir: Vector3<f64>,
}

impl Ray {
    pub fn new(origin: Vector3<f64>, dir: Vector3<f64>) -> Self {
        Self {
            origin,
            dir,
        }
    }
}
Then we need to iterate over the pixels on the screen
and construct a ray going through the pixel from a fixed origin some distance behind.
To do this we will create a struct called Screen that will hold the height,
width and focus distance. Screen will also be the struct for which
we define all the rendering methods later.
// renderer/mod.rs

use term_size;

pub struct Screen {
    w: usize,
    h: usize,
    focus_dist: f64,
}

impl Screen {
    pub fn new(focus_dist: f64) -> Self {
        let mut screen = Self {
            w: 0,
            h: 0,
            focus_dist,
        };

        screen.update_size();

        println!("\x1b[?25l"); // Hide cursor
        println!("\x1b[2J"); // Clear terminal

        return screen;
    }

    pub fn update_size(&mut self) {
        if let Some(s) = term_size::dimensions() {
            self.w = s.0;
            self.h = s.1;
        }
    }
}
The ansi codes "\x1b[?25l" and "\x1b[2J" hides the cursor and clears the terminal respectively. You will see more of theese types of codes later.
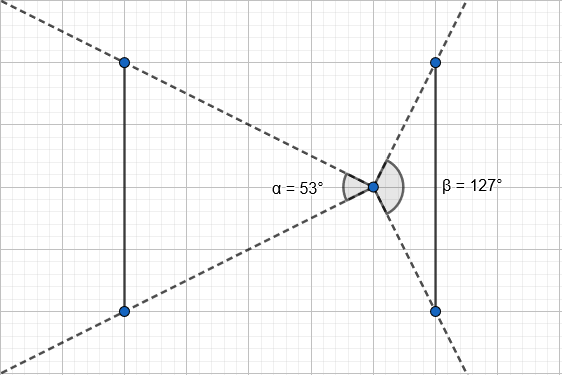
Note that focus_dist is what determines the feild of view (fov).
A lower focus distance will give a higher feild of view as
shown by the image below:

We will also need a struct which hold the position of our origin.
We will call this struct Camera and later we will add a rotation to it aswell.
// renderer/mod.rs
use vec3_rs::Vector3;

pub struct Camera {
    pub pos: Vector3<f64>,
}

impl Camera<f64> {
    pub fn new(pos: Vector3<f64>) -> Self {
        Self {
            pos,
        }
    }
}
Now we can finally create our render method for the Screen struct.
// renderer/mod.rs

use crate::math;

impl Screen {
  pub fn render(&self, camera: &Camera) {
          for row in 0..self.h {
              for col in 0..self.w {
                  let ray_o = camera.pos; // Ray Origin
                  let row = (row as f64 / self.h as f64) * 2. - 1.; // Scale from -1 to +1
                  let col = (col as f64 / self.w as f64) * 2. - 1.; // --||--

                  // Ray
                  let ray = math::Ray::new(ray_o, Vector3::new(col, row, self.focus_dist));
              }
          }
      }
}
Okay, we have now constructed our rays, they will have the same origin as the camera and will have the direction of the column and row it is shooting through. Note that the focus distance is the z-coordinate of the direction and that we scale the screen coordinates from -1 to 1;
Adding Triangles
All Right we have constructed our Rays but they have nothing to hit at
the moment. For this we're going to define a Triangle Struct and a Mesh Struct
// math/mod.rs
use crate::math;

use std::rc::Rc;

pub struct Tri {
    pub v0: Vector3<f64>,
    pub v1: Vector3<f64>,
    pub v2: Vector3<f64>,
}

pub struct Mesh {
    pub tris: Rc<[Tri]>,
}

impl Tri {
    pub fn new(v0: Vector3<f64>, v1: Vector3<f64>, v2: Vector3<f64>) -> Self {
        Self { v0, v1, v2 }
    }
}

impl Mesh {
    pub fn new(tris: Vec<Tri>) -> Self {
        Self { tris: tris.into() }
    }
}
We will also add a Mesh as a parameter to the render function and loop
through the triangles for each Ray to determine which one it hits.
// renderer/mod.rs

impl Screen {
  pub fn render(&self, camera: &Camera, mesh: &math::Mesh) {
          for row in 0..self.h {
              for col in 0..self.w {
                  let ray_o = camera.pos; // Ray Origin
                  let row = (row as f64 / self.h as f64) * 2. - 1.; // Scale from -1 to +1
                  let col = (col as f64 / self.w as f64) * 2. - 1.; // --||--

                  // Ray
                  let ray = math::Ray::new(ray_o, Vector3::new(col, row, self.focus_dist));

                  // Get hit triangle and distance to hit
                  let (hit_tri, distance) = {
                    let mut hit_tri = None;
                    let mut dist = f64::MAX;
                    for tri in mesh.tris.iter() {
                        if let Some(d) = tri.hit(ray) {
                            if d < dist {
                                dist = d;
                                hit_tri = Some(tri);
                            };
                        };
                    }
                    (hit_tri, dist)
                  };

              }
          }
      }
}
Okey, we now have a loop that will calculate the hit triangle and the distance to the hit.
But we used a method hit on our triangle which we haven't defined yet.
Determining triangle hit
We will now define the before mentioned hit method. It will be an implementation of the
möller-trumbore algorithm
for this we will use something called the barycentric coordinates to determine a triangle hit.
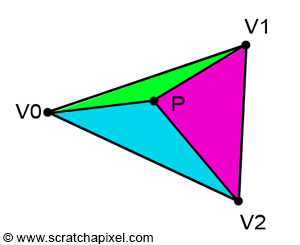
Barycentric coordinates is a way of representing coordinates in terms
of the areas of each triangle formed by the coordinate and the opposite side of the triangle.
Like in the picture below

This type of coordinate is useful because it helps us check if a ray hits the triangle by first checking where the ray hit's the plane of the triangle and then that none of the barycentric coordinates are negative (A negative area would mean that the point is outside of the triangle) This method is called the möller-trumbore algorithm. You can read more about it here
// math/mod.rs

impl Tri {

    // Möller-Trumbore algo (https://www.scratchapixel.com/lessons/3d-basic-rendering/ray-tracing-rendering-a-triangle/moller-trumbore-ray-triangle-intersection.html)
    pub fn hit(&self, ray: &Ray) -> Option<f64> {
        let e1 = self.v1 - self.v0;
        let e2 = self.v2 - self.v0;
        let p = ray.dir.cross(&e2);
        let det = e1.dot(&p);
        const EPSILON: f64 = 0.001;

        // If determinant is close to zero the ray and triangle are parallel
        if det.abs() < EPSILON {
            return None;
        }

        let inv_det = 1. / det;
        let t = ray.origin - self.v0;
        let u = t.dot(&p) * inv_det;
        if u < 0. || u > 1. {
            return None;
        };

        let q = t.cross(&e1);
        let v = ray.dir.dot(&q) * inv_det;
        if (v < 0. || u + v > 1.) {
            return None;
        }
        let t = e2.dot(&q) * inv_det;
        return Some(t);
    }

}
This solution is derived from the equation of the point using barycentric coordinates (P = A + u(B-A)+ v(C-A)) and the parametarised equation of the line (P = O + tD). See Wikipedia and Scratchapixel to learn more.
But that's it for the hit function.
Save pixel colors to buffer
Now we will go back to the render function and save the color of
the closest hit trangle to a buffer.
// renderer/mod.rs

impl Screen {
    pub fn render(&self, camera: &Camera, mesh: &math::Mesh) {
        // Init buffer
        let buffer = Vec::with_capacity(self.w * self.h);

        for row in 0..self.h {
            for col in 0..self.w {
                let ray_o = camera.pos; // Ray Origin
                let row = (row as f64 / self.h as f64) * 2. - 1.; // Scale from -1 to +1
                let col = (col as f64 / self.w as f64) * 2. - 1.; // --||--

                // Ray
                let ray = math::Ray::new(ray_o, Vector3::new(col, row, self.focus_dist));

                // Get hit triangle and distance to hit
                let (hit_tri, distance) = {
                    let mut hit_tri = None;
                    let mut dist = f64::MAX;
                    for tri in mesh.tris.iter() {
                        if let Some(d) = tri.hit(&ray) {
                            if d < dist {
                                dist = d;
                                hit_tri = Some(tri);
                            };
                        };
                    }
                    (hit_tri, dist)
                };

                if let Some(t) = hit_tri {
                    // push to buffer
                    buffer.push(t.color);
                } else {
                    buffer.push(Vector3::new(0., 0., 0.));
                }
            }
        }
    }
}
For this we need to add a color feild to our triangle struct
// math/mod.rs

pub struct Tri {
    pub v0: Vector3<f64>,
    pub v1: Vector3<f64>,
    pub v2: Vector3<f64>,
    pub color: Vector3<f64>,
}

impl Tri {
    pub fn new(v0: Vector3<f64>, v1: Vector3<f64>, v2: Vector3<f64>, color: Vector3<f64>) -> Self {
        Self { v0, v1, v2, color }
    }
}
Showing buffer
To show the buffer we will add a flush method on the screen struct and call it at the end of the render function.
// renderer/mod.rs

impl Screen {
    pub fn render(&self, camera: &Camera, mesh: &math::Mesh) {
        let mut buffer = Vec::with_capacity(self.w * self.h);
        for row in 0..self.h {
            for col in 0..self.w {
                let ray_o = camera.pos; // Ray Origin
                let row = (row as f64 / self.h as f64) * 2. - 1.; // Scale from -1 to +1
                let col = (col as f64 / self.w as f64) * 2. - 1.; // --||--

                // Ray
                let ray = math::Ray::new(ray_o, Vector3::new(col, row, self.focus_dist));

                // Get hit triangle and distance to hit
                let (hit_tri, distance) = {
                    let mut hit_tri = None;
                    let mut dist = f64::MAX;
                    for tri in mesh.tris.iter() {
                        if let Some(d) = tri.hit(&ray) {
                            if d < dist {
                                dist = d;
                                hit_tri = Some(tri);
                            };
                        };
                    }
                    (hit_tri, dist)
                };

                if let Some(t) = hit_tri {
                    buffer.push(t.color);
                } else {
                    buffer.push(Vector3::new(0., 0., 0.));
                }
            }
        }
        self.flush(&buffer);
    }

    pub fn flush(&self, buffer: &[Vector3<f64>]) {
        print!("\x1b[H"); // Move curor Home
        for row in 0..self.h {
            for col in 0..self.w {
                let color = buffer[row * self.w + col];
                print!(
                    "\x1b[48;2;{r};{g};{b}m ",
                    r = color.get_x() as u8,
                    g = color.get_y() as u8,
                    b = color.get_z() as u8
                )
            }
            print!("\r\n");
        }
        print!("\x1b[48;2;255;255;255m");
    }
}
The flush starts by moving the cursor "home" (to the upper left corner) by printing the ansi code "\x1b[H" to the terminal, "\x1b" is a escape character and "[H" moves the cursor home. We then iterate through the buffer and prints a space with the rigth color. To set the color we also use ansi-codes, "[48" means that we will set the background color, ";2" means that the color will be rgb and then we can set the rgb-values using string formatting. To learn more about terminal colors, This stac-overflow conversation is a great resource. After each row we also print "\r\n" to move to the next line.
Test it
To test the program add a screen, camera and mesh to your main function
and run render on the screen.
// main.rs

use vec3_rs::Vector3;

fn main() {
    let screen = terminal_renderer::renderer::Screen::new(0.1);
    let camera = terminal_renderer::renderer::Camera::new(Vector3::new(0., 0., -2.));
    use terminal_renderer::math::Tri as T;
    let mesh = vec![T::new(
        Vector3::new(0., -5., 0.),
        Vector3::new(10., 5., 0.),
        Vector3::new(0., 5., 0.),
        Vector3::new(255., 255., 0.),
    )];
    let mesh = terminal_renderer::math::Mesh::new(mesh);
    screen.render(&camera, &mesh);
}
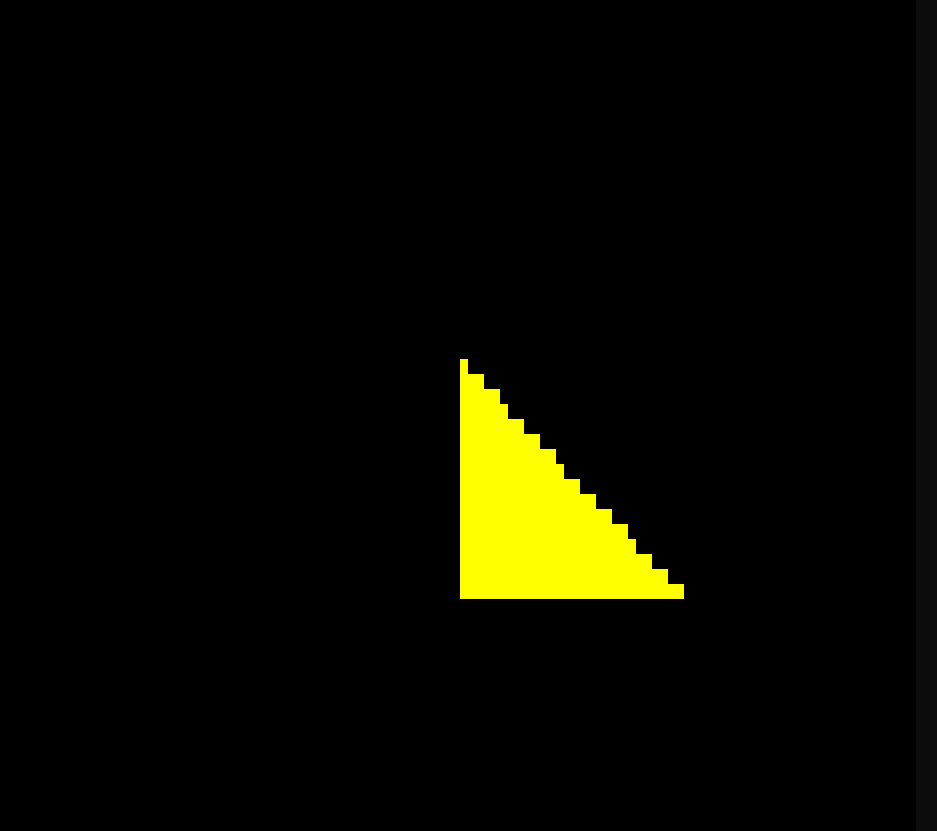
And then run the program. You should see this in your terminal.

A flat triangle! ...
Simple shading
To do some simple shading we will compare theray direction to the triangle normal. If the angle is large we will darken the color, If we are looking straight at it we will include the full color. We will also darken far away points creating a sort of fog effect.
// renderer/mod.rs

// in render method
if let Some(t) = hit_tri {
    let normal = t.normal();
    let inv_dir = ray.dir * -1.;
    let a = normal.angle(&ray.dir).min(normal.angle(&inv_dir));
    let f = 1.0 - a.abs() / PI;
    const RENDER_DIST: f64 = 75.;
    let color = t.color * f * ((RENDER_DIST - distance) / RENDER_DIST).max(0.);
    buffer.push(color);
} else {
    buffer.push(Vector3::new(0., 0., 0.));
}
To really see this effect clearly we will need a more complicated shape. Let's make a rotating triangle!
// main.rs

use vec3_rs::Vector3;

fn main() {
    let screen = terminal_renderer::renderer::Screen::new(1.);
    let camera = terminal_renderer::renderer::Camera::new(Vector3::new(0., 0., -6.));
    use terminal_renderer::math::Tri as T;
    let mut t: f64 = 0.0;
    loop {
        t += 0.01;
        let mesh = vec![T::new(
            Vector3::new(-t.cos() * 5., -5., -t.sin() * 5.),
            Vector3::new(0., 5., 0.),
            Vector3::new(t.cos() * 5., -5., t.sin() * 5.),
            Vector3::new(0., 255., 0.),
        )];
        let mesh = terminal_renderer::math::Mesh::new(mesh);
        screen.render(&camera, &mesh);
    }
}
Run this and you should see a rotating triangle with some simple shading.
Conclusion
In this post we have learned how to build a simple 3D-renderer for the terminal. In the next blog-post I will build a 3D-file loader so that we can load files and view them in the terminal. We will also add camera rotation so that we can move and rotate the camera around a scene.